
Adding pickup point carriers
Setting up pickup point carriers in Globe Pickup Points is a crucial step in providing your customers with flexible delivery options. This guide walks you through the process of adding a carrier, configuring settings, and tailoring the experience to meet your store’s needs.
Adding a carrier
Section titled “Adding a carrier”To enable a pickup point carrier, follow these steps:
- Open Globe Pickup Points: Navigate to the Globe app in your Shopify admin.
- Add a New carrier:
- Click Add carrier.
- Select Your Carrier:
- Choose the desired carrier from the list (e.g., UPS, Packeta, Zasilkovna, DHL, etc.).
- Map Shipping Methods:
- Select specific shipping methods from your store’s shipping rates.
- Alternatively, specify shipping methods using keywords (e.g., “pickup,” “locker”).
Showing several carriers as one shipping option
Section titled “Showing several carriers as one shipping option”You can offer pickup points from several carriers as one shipping option at checkout, for example a single “Pickup point” option with Mondial Relay, Chronopost and Colissimo points on one map:
- In Shopify admin (Settings → Shipping and delivery), create one shipping rate, e.g. “Pickup point”.
- In Globe, add each carrier and map all of them to this same shipping rate.
Checkout then shows a single shipping option. The pickup point selector loads points from all mapped carriers into one map and list, sorted by distance, and each point shows its carrier’s logo. The order is saved with the carrier of the selected point, and that carrier’s order attributes, tags and notes apply.
All carriers share the price of the one Shopify shipping rate. For shipping labels, use the manual Create shipping labels panel: automatic label creation with Flow needs a shipping method that maps to a single carrier.
Configuring carrier settings
Section titled “Configuring carrier settings”Once your carrier is added, you can customize additional settings to optimize your workflow:
Order attributes
Section titled “Order attributes”- Add custom order attributes to pass data to third-party systems.
- Example: Use
PickupPointId: {{ point.id }}to include the pickup point ID in your order. For details, see Order attributes.
Order tags
Section titled “Order tags”- Configure tags for orders:
- Selected Pickup Point Orders: Automatically tag orders where a pickup point is selected.
- Unselected Pickup Point Orders: Tag orders where the customer has not yet selected a pickup point.
Order notes
Section titled “Order notes”- Choose whether to update the order note with pickup point details, such as name, address, and ID.
Shipping address update
Section titled “Shipping address update”- Replace the shipping address fields with pickup point details (e.g., replace address line with point name or city with point city).
For details, see Shipping address update.
Restricting pickup point types
Section titled “Restricting pickup point types”Some carriers support the option to restrict pickup point types — you’ll find the restriction section at the bottom of the carrier’s settings in Globe. This allows you to display only specific types of pickup points, such as:
- Automated Lockers: For carriers with self-service lockers.
- Branches Only: To exclude other types like lockers or P.O. boxes.
This setting ensures that customers only see the pickup point types you want to offer. It works per carrier network — for example PPL distinguishes ParcelShop, ParcelBox and AlzaBox; Nova Post distinguishes its point types as well.
Offering point types as separate shipping options
Section titled “Offering point types as separate shipping options”You can also let customers choose the point types as separate shipping options at checkout — a common request when the types differ in price or payment support (for example offering AlzaBox separately from PPL ParcelShop/ParcelBox). This is available today, no special feature needed:
- In Shopify admin (Settings → Shipping and delivery), split the carrier into two shipping rates, e.g. “PPL ParcelShop / ParcelBox” and “AlzaBox”.
- In Globe, add the same carrier twice — once for each shipping rate — and map each instance to its rate.
- In each instance’s settings, use the pickup point type restriction at the bottom: leave only AlzaBox enabled on one, and ParcelShop + ParcelBox on the other.
Each option then shows only its own pickup points on the map, with the price coming from its own Shopify shipping rate. The same pattern works for any carrier that exposes multiple point types.
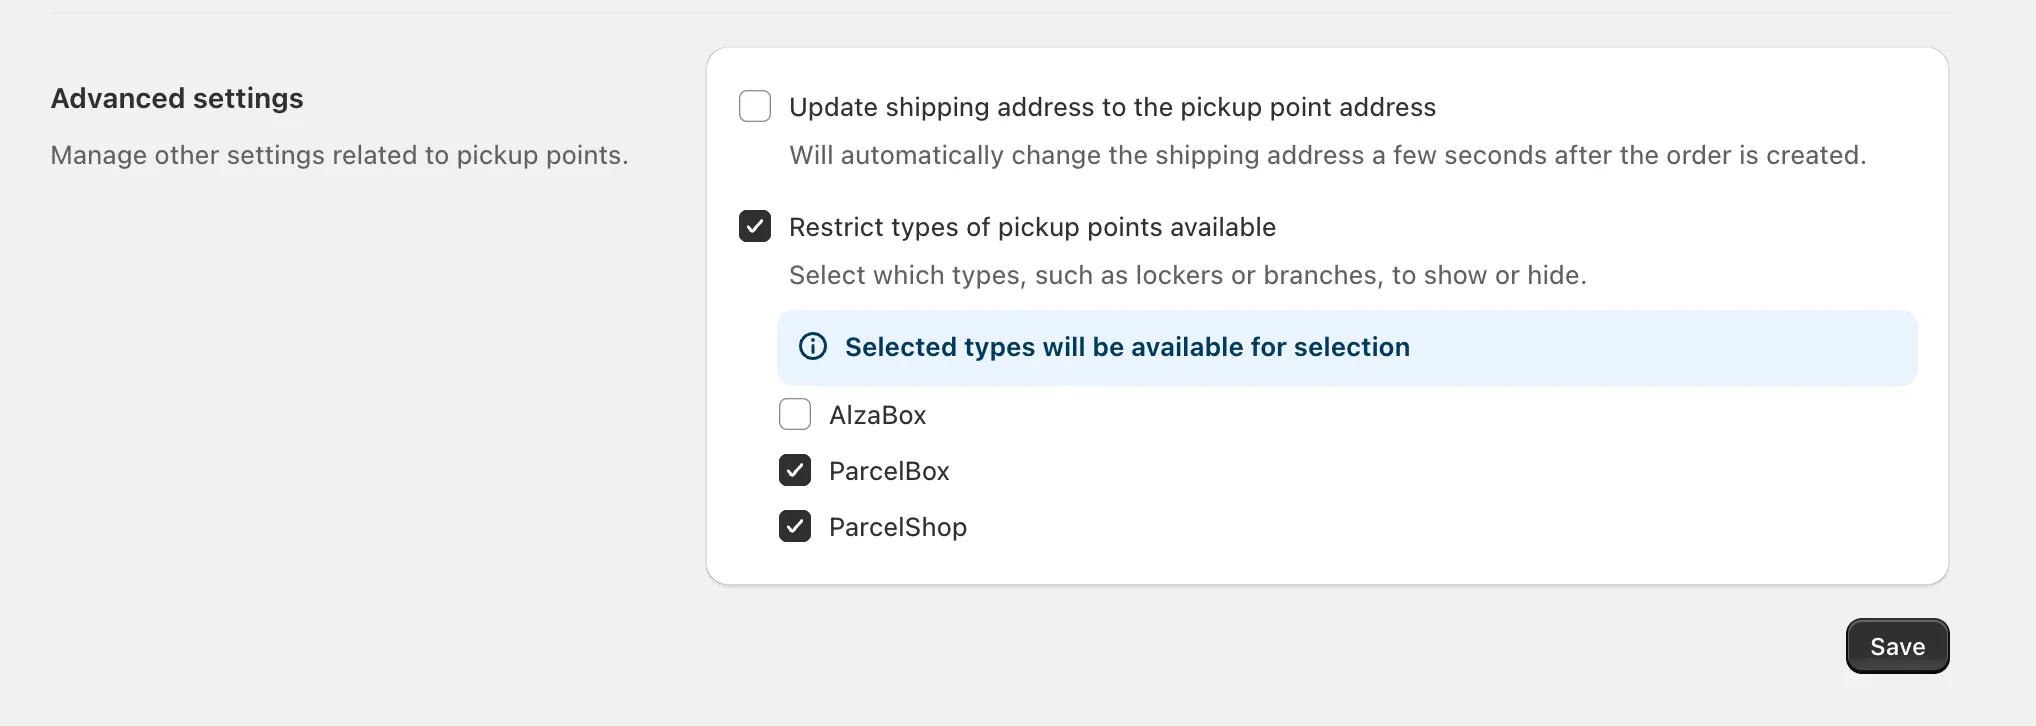 The “ParcelShop / ParcelBox” instance — AlzaBox unchecked here and enabled on the second PPL instance instead.
Email reminders
Section titled “Email reminders”Globe allows you to configure automated email reminders for orders with unselected pickup points. These emails use Shopify’s default notification template and can be customized to align with your brand:
- Languages: Add email reminders in different languages.
- Logos: Include your store logo in the email.
- Button Colors: Set a custom color for the selection button to match your branding.
- Nearest pickup points: List the 5 nearest pickup points in the email, so customers choose one straight from it. For all settings, see Email reminders. For custom email design, see Can I use a custom design for missing point email reminders?.
Finalizing your setup
Section titled “Finalizing your setup”Once you’ve configured your carrier settings:
- Test your configuration by simulating an order.
- Ensure pickup point data is correctly applied to order attributes, tags, and notes.
- Verify email reminders and other settings to ensure a smooth customer experience.